Important: This version of the mobile app will no longer be downloadable or supported as of Nov 1, 2025.
Download the NEW Vantaca Manage App for a more user-friendly and streamlined app experience!
Summary: This article explains how to perform a Full Inspection using the Mobile App.
- Select Full Inspection from the Inspection page.
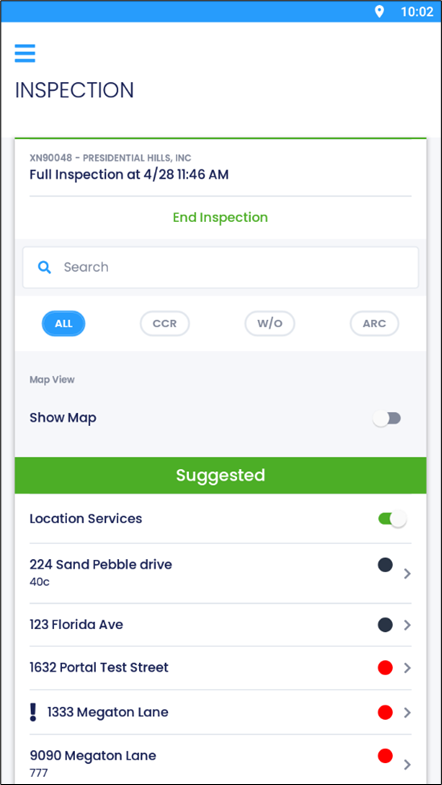
- An XN Number will automatically be created, and the current inspection information will be displayed.
- Use the search field to find a specific address.
- The list of displayed addresses can be filtered using the following filters:
- All
- CCR
- W/O (Work Order)
- ARC
- The Show Map Toggle can be enabled to display a map based on your geolocation.
- Note: This feature will no work if you have not allowed the App permission to use your location.
- The Location Services Toggle will show the ten closest properties to you based on your geolocation.
- Note: This feature will no work if you have not allowed the App permission to use your location.
- Select an address to perform an inspection on.
-
Note:
A blue dot represents an address with an open work order.
A red dot represents an address with open violations.
A green dot represents an address with open ARC items.
A ! symbol represents an address with open Closing items.
If the address has an open work order and an open violation, the dot with default to red.
-
Note:
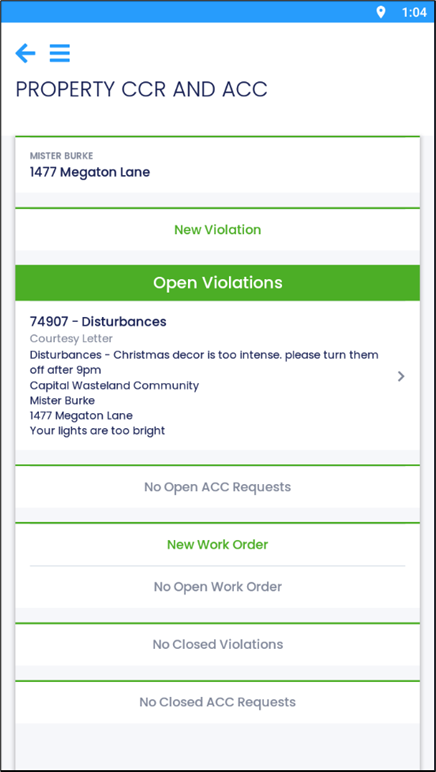
- The Property page displays the following information:
-
Open Violations
- If none exist, field will display as No Open Violations
-
Open ACC Requests
- If none exist, field will display as No Open ACC Requests
-
Open Work Orders
- If none exist, field will display as No Open Work Orders
-
Closed Violations
- If none exist, field will display as No Closed Violations
-
Closed ACC Requests
- If none exist, field will display as No Closed ACC Requests
- If none exist, field will display as No Closed ACC Requests
-
Open Violations
- Open Items can be selected to view their details.
-
- Note: Options vary per association but typically items can be approved/declined or stepped from here as well as editing existing fields.
-
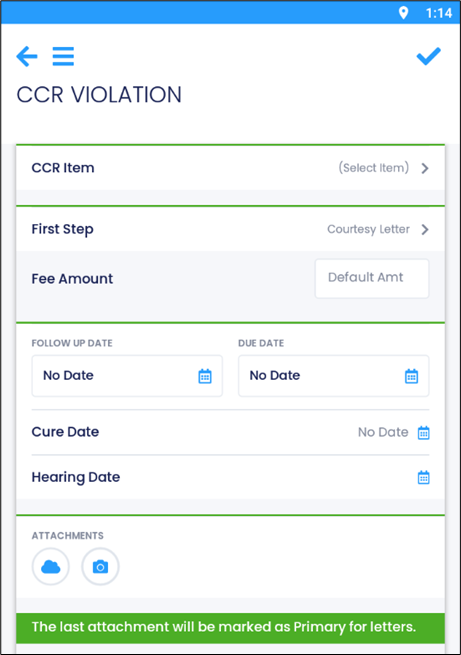
- Select New Violation to create a new violation.
- Select a CCR Item.
- Select the First Step.
- Note: This will vary based on the selected CCR Type.
- Enter the Fee Amount.
- Select a Follow Up Date and Due Date.
- Select a Cure Date.
- Select a Hearing Date.
- Attachments can be added using the following options:
- Uploaded from your device’s storage by selecting the Cloud Icon
 .
- Or, taking a photo by selecting the Camera Icon
 .
- Uploaded from your device’s storage by selecting the Cloud Icon
- Select the Checkmark Icon
 to save changes.
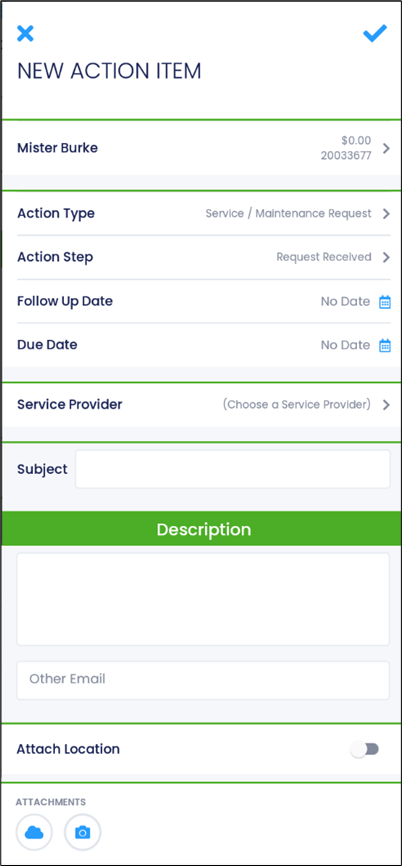
- Select New Work Order to create a new work order.
- Select a Homeowner from the Homeowner List.
- The Association can be changed by selecting the current association and selecting from the association list.
- Select an appropriate Action Item. Example: Service/Maintenance Request or Work Order.
- Select the Action Step.
- Note: This will vary based on the selected Action Item.
- Select a Follow Up Date and a Due Date.
- Select a Service Provider.
- Enter a Subject in the provided field.
- Enter a Description.
- Note: This will fill in the Action Item Description field.
- Enter an Email to tag in the Action Item.
- The Attach Location Toggle will use your current geolocation as a reference point in the Action Item.
- Attachments can be added using the following options:
- Uploaded from your device’s storage by selecting the Cloud Icon .
- Or, taking a photo by selecting the Camera Icon .
- Uploaded from your device’s storage by selecting the Cloud Icon
- Select the Checkmark Icon to save changes.
- Select a Homeowner from the Homeowner List.
- Select End Inspection to end the inspection.
-
- The following confirmation message will appear:
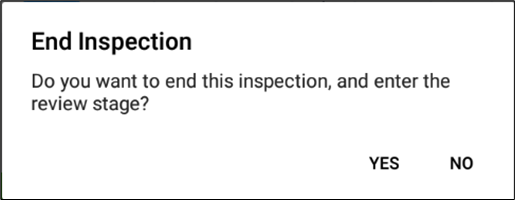
- "“End Inspection” Do you want to end this inspection, and enter the review stage?”
- Select No to return to the current inspection.
- Select Yes to step the Inspection to the review stage.
- Note: This will place the inspection at the bottom of the Review Inspection
- "“End Inspection” Do you want to end this inspection, and enter the review stage?”
- The following confirmation message will appear:
-
Comments